My new model involves making pinwheel gears. I used to do this in Illustrator and used the tutorial on the Cabaret Mechanical Theatre website for this. However, I no longer have this software and instead went for the Open Source alternative of Inkscape. I had trouble working out how to make the pinwheels at first but now have a method. I thought I'd create a PDF and provide a download link for those who are interested in it:
http://www.mediafire.com/view/?z0r4prji5oaptz0
One of the nice things about making automata is that the materials do not necessarily have to be expensive. I'd find it hard to justify spending hundreds of pounds on a piece of software to assist with the design process, so I use a free alternative.
Of course, another alternative would be to just use a protractor, ruler and a compass but I always find my accuracy slightly off with this method.
I hope this helps. If you have any queries, please comment/contact me.
Friday, 28 December 2012
Thursday, 27 December 2012
Post seasons greetings
Hello and seasons greetings to you all. Just thought I'd give a quick update following Christmas.
I've started working on my next model which I will make in time for Valentine's day (hopefully). I've made the frame and am going to incorporate a pin wheel gear, as I 'm fed up with work gears. Besides, pin wheel gears can be tricky to make accurately so there's a challenge there in itself. Pics to follow soon.
I have also been shopping on line and have bought a few new goodies, such as a block plane, a drill press stand and a drill holder so I can turn my drill into a lathe of sorts. This should allow me to do more interesting things and hopefully with a bit more accuracy.
I might also be getting a workshop in the new year! Good times!
Anyway, back to the model.
Thursday, 6 December 2012
Ta da!
For your pleasure and amusement (hopefully), here is a video of my latest automaton, "Cruel Santa":
I hope you forgive the poor quality and editing.
Also, Santa has extra short legs because I believe every cruel tyrant should be mocked in some way to make them less scary and deny them the power of fear over their subjects.
I also didn't give them any eyes as I was concerned I would mess them up and ruin the whole piece.
Wednesday, 5 December 2012
A Christmas miracle!
Well, not really a miracle and more like a bit of hard work but the model is finished. I'll be creating, editing and uploading a vid tomorrow. Then onto eBay. In the meantime, here is a picture of the cams I used.


Tuesday, 27 November 2012
OK, so it didn't work
Not because the shapes were incorrect but it comes down to the same problem of measurments not being precise, which then has an impact on other parts of the mechanism. I think I got 2 movements working but it looks messy. Better to do the job properly then leave it messy and prone to breaking.
Because of this, I won't be able to finish the model before Christmas.
I could always save it for next Christmas, or maybe as an early new year model.
Because of this, I won't be able to finish the model before Christmas.
I could always save it for next Christmas, or maybe as an early new year model.
Thursday, 22 November 2012
I hope this works!
So...I have an idea for how to design the cam wheels. Hopefully it'll work.
I have made a series of radial circles and have marked each dividing line with a number which I am using for timing, so when one part of the model does something at this point on this cam, something else will happen at the same point on the other cam.

I have made a series of radial circles and have marked each dividing line with a number which I am using for timing, so when one part of the model does something at this point on this cam, something else will happen at the same point on the other cam.

It's a bit messy but hopefully it'll at least give me some idea of how it will all work. I'm going to make the cams out of cardboard first, rather than cut the wood straight away. I also forgot that the cams are turning anti-clockwise so I need to reverse the cut-outs so they move the right way.
Note to self: get cardboard.
Thursday, 15 November 2012
Ready in time for Christmas?
Well, progress has been kinda slow so I'm not even sure that the model will be ready in time for Xmas. I'll do my best though. Here are some random pics:


I've also redesigned the mechanism a bit and removed the gears and replaced this with a belt drive to sow things down. Next stop, working out where to place the levers and also to make the cams.
How I wish I had a scroll saw...


I've also redesigned the mechanism a bit and removed the gears and replaced this with a belt drive to sow things down. Next stop, working out where to place the levers and also to make the cams.
How I wish I had a scroll saw...
Wednesday, 7 November 2012
Today's news is about the 'views'
1002 views of my blog! Woohoo! I must admit though, having my model featured on Dug North's site increased the traffic a lot. Thanks!
I am currently using Code Avengers to learn HTML and CSS. I have a mock website which features a fake automata business which is online. I hope Google isn't giving many hits of that site as I'd feel bad. However, there is a live link to this blog so I hope people appreciate that at least.
Work on the model continues. Applying some paint to the Santa figure and have the linkages worked out. Now to work on the elf.
If that made no sense, all will be made clear soon.
Wednesday, 31 October 2012
Christmas model 2012 update
Below are some pictures of the Christmas model I am making this year.
I have been experimenting with gear trains but the movement seemed a little too fast. I thought about using another worm gear but remembered how long it took last time and thought I'd experiment with a coiled worm gear (if that's the correct phrase). I got the idea from this website:
http://sidestreet.info/index.html
Specifically this model:
http://sidestreet.info/automata/billy.html
It seemed so much simpler than carving a gear. Check out the entire gallery, there are some great pieces!
I gave it a go but it still didn't work as planned (actually became a bit too slow!). I removed a gear from the train but it still didn't seem right. I then remembered I had an old wooden worm gear I had carved but this has been too fast for my previous model. I have attached it and hopefully it will be the right speed.
I have also started carving the figure. I'm really not sure what style to go for. I think I'm still trying to develop my own but am struggling to find something I am happy with.
Anyway, here are the pics


I also managed to sell my Turtle and Hand Automaton on EBay. I didn't get as much as I had hoped which is the problem with EBay. I think I need to analyse how much my models might actually be worth. I know I haven't made a name for myself yet so in terms of the value of these it might be different for different people. Maybe I shouldn't keep labelling myself as an amateur (even though I have much to learn).
Anyway, I hope the model has gone to a good home (and arrived there safely! I always worry when sending models by post in case they break!)
I have been experimenting with gear trains but the movement seemed a little too fast. I thought about using another worm gear but remembered how long it took last time and thought I'd experiment with a coiled worm gear (if that's the correct phrase). I got the idea from this website:
http://sidestreet.info/index.html
Specifically this model:
http://sidestreet.info/automata/billy.html
It seemed so much simpler than carving a gear. Check out the entire gallery, there are some great pieces!
I gave it a go but it still didn't work as planned (actually became a bit too slow!). I removed a gear from the train but it still didn't seem right. I then remembered I had an old wooden worm gear I had carved but this has been too fast for my previous model. I have attached it and hopefully it will be the right speed.
I have also started carving the figure. I'm really not sure what style to go for. I think I'm still trying to develop my own but am struggling to find something I am happy with.
Anyway, here are the pics

The Frame

A practice set-up I made by attaching it to my desk

A rough version with the gear train

A close up with the pin wheel

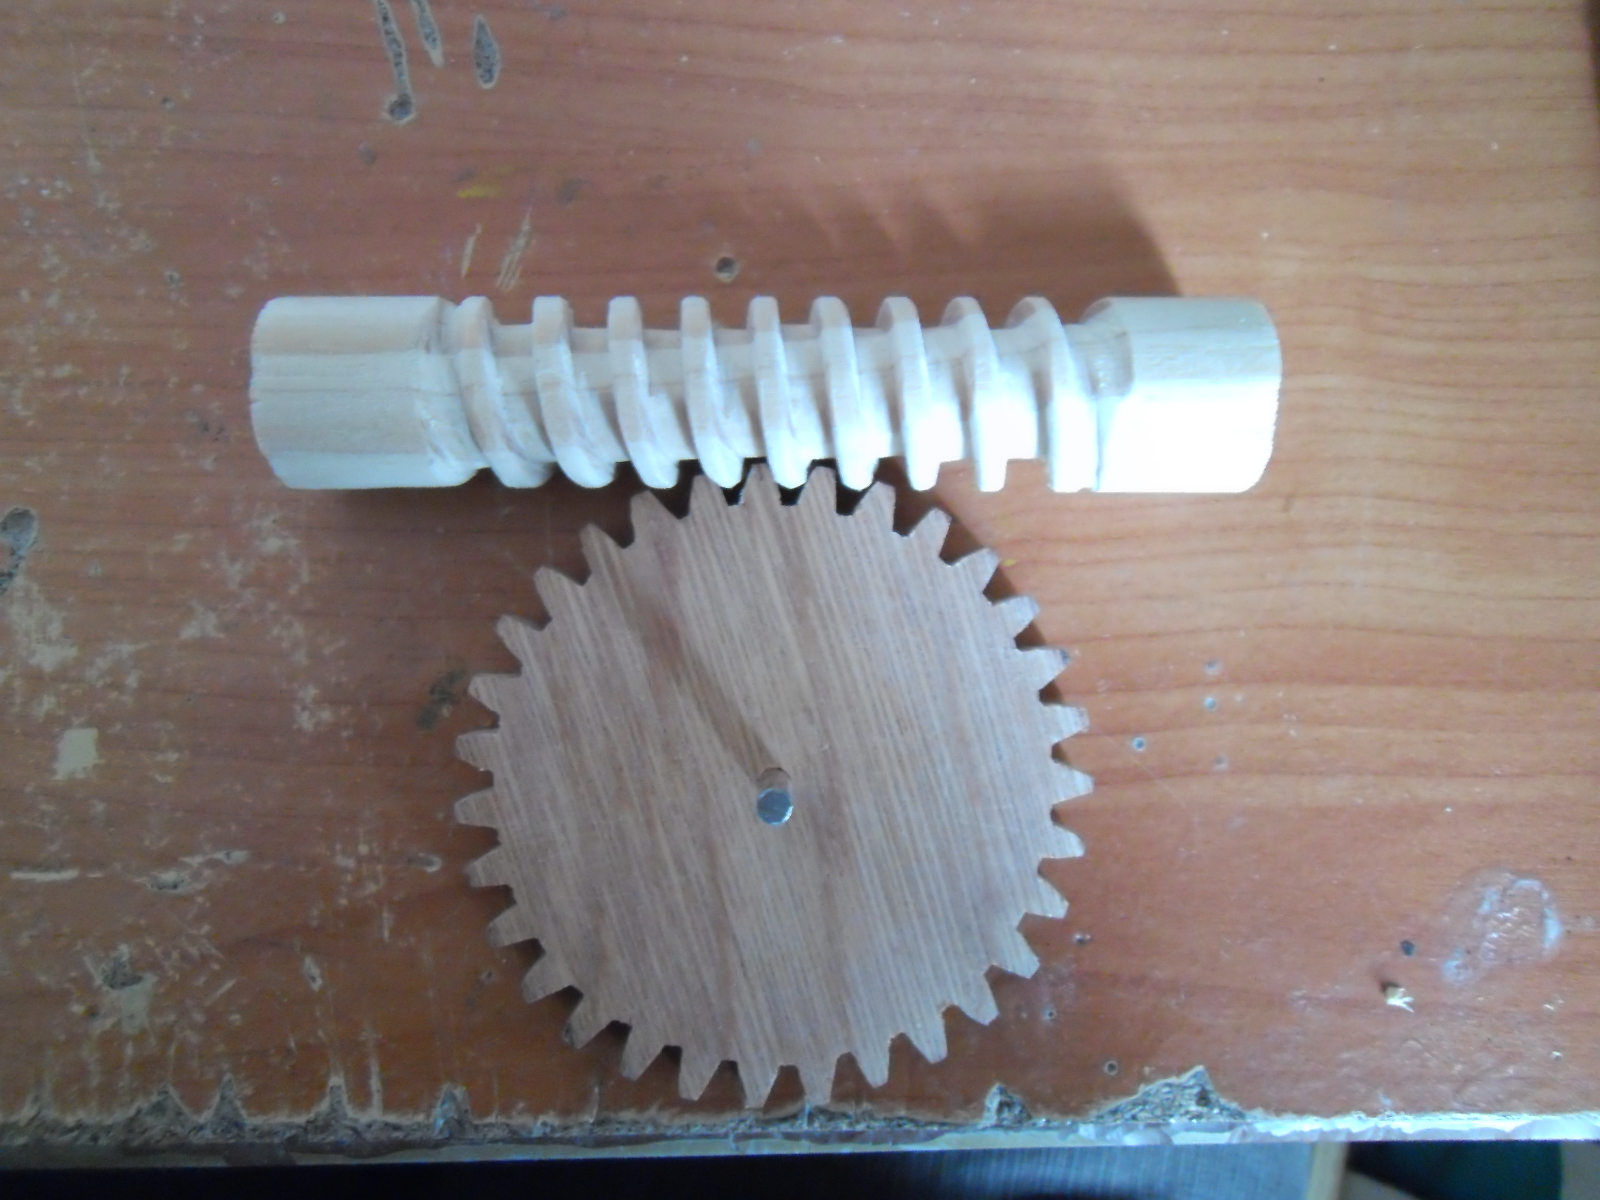
The pin wheel and worm before installing

A close up of the work in the frame. I had to carve out a channel in the wood to allow the pins to rotate freely.The problem I found with this gear is that during the rotation, there would be a slight pause where the worm wasn't making contact with the pin wheel which meant there was a pause in the movement, almost like with a ratchet set-up. I didn't want this effect as I wanted smooth continuous movement. it might have been that I hadn't made the gear or the worm as well as I'd hoped, which might have caused the problem.

With the wooden worm I had previously made. I had to made the channel even larger to accommodate the spur gear.I also removed the last gear on the train as it was too slow. I have saved them for another time. This gear allows for continuous movement.
Here are some vids for info:
I also managed to sell my Turtle and Hand Automaton on EBay. I didn't get as much as I had hoped which is the problem with EBay. I think I need to analyse how much my models might actually be worth. I know I haven't made a name for myself yet so in terms of the value of these it might be different for different people. Maybe I shouldn't keep labelling myself as an amateur (even though I have much to learn).
Anyway, I hope the model has gone to a good home (and arrived there safely! I always worry when sending models by post in case they break!)
Friday, 19 October 2012
Improved video and next project
I found out my camera has a HD setting for video. After I made a little set and filmed it, I had a delightful afternoon learning to edit on Movie Maker.
I hope people enjoy this new video as it is better quality.
My last video was featured on Dug North's blog, which was a nice surprise. Thanks Dug!
I also received some nice comments on the Automata/Automaton Facebook group. Check it out if you haven't already!
I've already started on my next model for Christmas. I am using a few gears to slow down the action. It'll hopefully be a model of santa using a whip to encourage an elf to make presents faster.
I better hurry up. Only 67 sleeps to go until Christmas day.
Monday, 15 October 2012
Saturday, 13 October 2012
Can see the finishing line...
I am almost complete. Check the pics and the vid.

The model with a weight I got from a fishing tackle shop. I'm not sure why I didn't think of this sooner instead of spending all that time making my own weights.

Front view of the gear

Here I had tested using springs but it was still too sharp a reaction. I also realised that I could control all the limbs and the head with one control lever so I now only have one for the head and limbs and another one to operate the hand.

Here is the reduced lever set-up with the weight. I have used a slightly smaller weight as this one was too heavy and not needed (I think - I'll need to add the limbs first and see how they react).
All I need to do now are add the wires for the limbs and make a few cosmetic changes, add a lick of varnish and it'll be done! :)
Saturday, 22 September 2012


Thursday, 20 September 2012
Pretty good lookin'
I may not know much but I'm pretty good at making worm gears now and their associated spur gear partner by hand. Probably because I've made so many mistakes on previous attempts.


They're still a pain in the arse though.
I've been working on another model for a friend's birthday. I'll update with pics after the event.
UPDATE: I've just tried to make another worm and spur gear which was a complete disaster. It looks like my smugness got the better of me. Time to learn some humility.
Friday, 14 September 2012
Almost..but not quite
Here is my worm gear setup.
It moves great with no jamming but the only problem is that it's still too fast!
I have printed out some new gear templates which are slightly larger and have more teeth. I might also have to think about a smaller diameter worm. This is my weekend project now.
It's nice to see that it's progressing though.
Sunday, 9 September 2012
Slower than the turle itself
So this is just a general update with a few pics.

My second attempt at a worm gear.

Here is my attempt to make a drum sander thing. The elastic bands were holding the sandpaper in place. It didn't last long.

Here I have started to lay out the spacing for some of the parts and
where to attach the main support for the gear wheel and the snail cam

An interior of the mechanics for the turtle. I have no idea how I'm going to link in the hand mechanism. I'll cross that bridge later.

My second attempt at a worm gear. It's definitely better than the last one. The problem I had was how to attach the drive shafts to either end of it. The wood was quite soft and I could never drill dead centre on either end of the gear in which to insert the drive shafts. This left it with a wobbly rotation. I thought that I could all the 2 discs on either end which already had pre-drilled holes but it didn't really work.

Just some more supplies I bought from a design & technology company in bulk. Go to Hindleys.com for more information

I made some weights as I couldn't find any that seemed heavy/light enough. I used 2 pence pieces wrapped in cloth. I wasn't sure if I needed 6 but I made them all the same.

Close up!

My latest worm gear! I used slow setting epoxy for the drive shafts and basically kept rotating along a straight edge to make sure that it stayed in place. This is probably the best one I have done so far. I think I'll be making another gear though as it doesn't mesh quite right with the worm (plus it looks a bit messy).
To do list:
- Make a new gear
- Make a temporary handle
- Attach the weights (makes some pulley wheels)
- Attach the guitar strings to the levers
- Test
- Work on the hand mechanism
- Time everything correctly
- Paint/varnish
- Job done
I've also started thinking about another model for Christmas. Lots to do.
Saturday, 18 August 2012
the turn of the worm
So, I made a worm gear using this tutorial (I couldn't have done it without this). I'm hoping the worm will deliver enough drive force to turn all the snail cams and lift the weights.
http://makeprojects.com/Project/Roll-Your-Own-Da-Vinci-Style-Worm-Gear/600/1#.UC-xwqOQmSp
So I checked the worm with the gear I made and it turns the wrong way. I'll have to do it all again. At least I know the theory now.The next stage had it been correct would to have been to sand it down.
Amateur indeed.
I've also been putting my new tube benders to use and now have some nicely bended brass tubing. The string flows smoothly through it now. Hopefully this will mean less friction is generated so I can use smaller weights.

UPDATE: After coming home after a night out, I started messing around with the worm gear and found that if I turn the gear at the bottom of the spur gear it would turn the spur gear anti-clockwise. However, if I move the worm gear to the top of the spur gear, it moves the spur gear in a clockwise direction. This means that with a small change to the design, I can still use the work gear I have made.
 I'm a bit too hungover to work out why it does this but I am happy with the outcome.
http://makeprojects.com/Project/Roll-Your-Own-Da-Vinci-Style-Worm-Gear/600/1#.UC-xwqOQmSp
 |
| This is the worm gear in its rough stages. I used a circular rasp to make the channels. The wood is from a mop handle |
 | ||
| This is the slightly more polished version |
Amateur indeed.
I've also been putting my new tube benders to use and now have some nicely bended brass tubing. The string flows smoothly through it now. Hopefully this will mean less friction is generated so I can use smaller weights.

UPDATE: After coming home after a night out, I started messing around with the worm gear and found that if I turn the gear at the bottom of the spur gear it would turn the spur gear anti-clockwise. However, if I move the worm gear to the top of the spur gear, it moves the spur gear in a clockwise direction. This means that with a small change to the design, I can still use the work gear I have made.

Subscribe to:
Posts (Atom)